


Understanding Seal Strength and Seal Width
What is Seal Strength in Packaging?
Seal strength is the mechanical force required to separate the bonded layers of a package. It serves as the primary indicator of how well a packaging machine has fused thermoplastic materials—such as PE, PP, or Mylar—together. In the context of industrial operations, this metric defines the package’s ability to withstand external stresses during shipping, handling, and storage.
For operators using Continuous Band Sealers, seal strength is not just about adhesion; it is the result of precise thermal transfer. The bond is formed when the material reaches its specific melting point, flows together, and then solidifies under pressure. High-quality sealing relies on the tensile strength of this bond exceeding the stress applied by the product’s weight, which can range from lightweight retail items to heavy 5kg industrial loads.
The Relationship Between Seal Width and Joint Integrity
The width of the seal is a critical variable in determining the overall reliability of the package. While a wider seal generally offers a greater barrier against leaks, joint integrity depends heavily on the consistency of heat application across that width. Our machinery utilizes pure copper heating blocks to ensure uniform temperature distribution, preventing weak spots regardless of the chosen width.
- 6mm Seals: Best suited for lightweight films (0.02–0.05mm) and small retail packaging where minimizing material usage and maintaining a sleek aesthetic are priorities.
- 10mm Seals: The industry standard for Continuous Band Sealers. This width provides a robust balance of strength and visual neatness, suitable for most medium-duty applications (1kg–3kg).
- 12mm Seals: Engineered for heavy-duty requirements, liquids, or powders. The extra surface area enhances burst resistance and significantly reduces the risk of contamination pathways or “channel leaks” in the seal area.
Why Proper Sealing is Critical for Product Safety
A secure seal is the first line of defense against environmental degradation and contamination. For products requiring extended shelf life, such as food items in aluminum foil or composite bags, seal integrity is non-negotiable. A compromised seal allows the ingress of moisture, oxygen, and bacteria, leading to rapid spoilage or product failure.
Beyond preservation, proper sealing ensures tamper evidence and physical containment. In high-volume production, utilizing a machine with stable temperature regulation (0-300°C) and adjustable pressure ensures that every package leaves the line hermetically sealed. This consistency protects the brand reputation by preventing leaks and ensuring that the end consumer receives the product exactly as intended.
Key Factors Affecting Seal Strength and Quality

Achieving a reliable package isn’t just about pressing a button; it requires balancing several technical variables. Whether running a high-volume production line or a small batch operation, understanding the mechanics behind the seal is essential for preventing product loss. We design our machinery to give operators full control over these critical factors to ensure consistent seal integrity.
Sealing Temperature and Dwell Time
The relationship between heat and time is the foundation of any thermal sealing process. If the temperature is too low, the material won’t reach its melting point, resulting in a weak “tack” seal that fails under stress. If it’s too high, the film degrades, becoming brittle or burnt.
- Temperature Range: Our continuous band sealers offer an adjustable range of 0-300°C (392°F). This wide range allows for precise tuning depending on the material’s melting point.
- Thermal Consistency: We utilize pure copper heating blocks in our FR-900 series. Copper provides superior thermal conductivity compared to standard steel, ensuring the temperature remains stable even during rapid, continuous operation.
- Dwell Time: This is determined by the conveyor speed, which is adjustable from 0-12m/min. A slower speed increases dwell time, allowing more heat energy to transfer into thicker films (up to 0.80mm), while faster speeds increase throughput for thinner materials.
Sealing Pressure and Force Distribution
Heat melts the material, but pressure is what fuses the layers together. Without adequate force, even molten plastic will not form a cohesive bond. On our continuous band sealers, the pressure wheel plays a vital role in compressing the heated film as it passes through the cooling blocks.
- Uniformity: Consistent pressure across the entire seal width (standardized at 6mm, 10mm, or 12mm) prevents air pockets and weak spots.
- Adjustment: The pressure must be calibrated to the bag thickness. Thicker composite bags require higher compression to ensure the inner sealant layers merge completely, directly impacting the final tensile strength of the package.
Material Selection and Barrier Properties
Different packaging materials react differently to heat and pressure. A setting that works for simple Polyethylene (PE) will likely fail on a multi-layer laminate. Understanding your material’s specific thermal properties is key to setting up the machine correctly.
- Plastic Films (PE/PP): These generally require lower temperatures and faster speeds.
- Laminates and Foil: Materials like bulk tin foil or Mylar act as heat sinks. They require higher temperature settings and slower conveyor speeds to drive heat through the metal layer to the sealant interface.
- Thickness: Our machines handle films from 0.02mm to 0.80mm. As thickness increases, the resistance to heat transfer increases, requiring adjustments to maintain minimum seal strength.
Environmental Conditions and Contamination
Even with perfect machine settings, external factors can compromise the seal. In industrial environments, the cleanliness of the seal area is often overlooked but critical.
- Contamination: Dust, powder, grease, or liquid in the seal area acts as a barrier, preventing the plastic layers from fusing. This is a common cause of channel leaks.
- Component Wear: Worn-out Teflon belts can lead to uneven heating or texture transfer issues. Regular inspection of the sealing bands ensures that environmental wear and tear doesn’t degrade the final output quality.
Industry Standards for Seal Strength Testing
In the packaging world, guessing isn’t an option. We rely on established standards to ensure that the seals produced by our machinery—whether it’s a continuous band sealer or a vacuum unit—can withstand real-world supply chain rigors. Adhering to these ASTM protocols ensures seal integrity and protects your brand reputation.
ASTM F88: Standard Test Method for Seal Strength
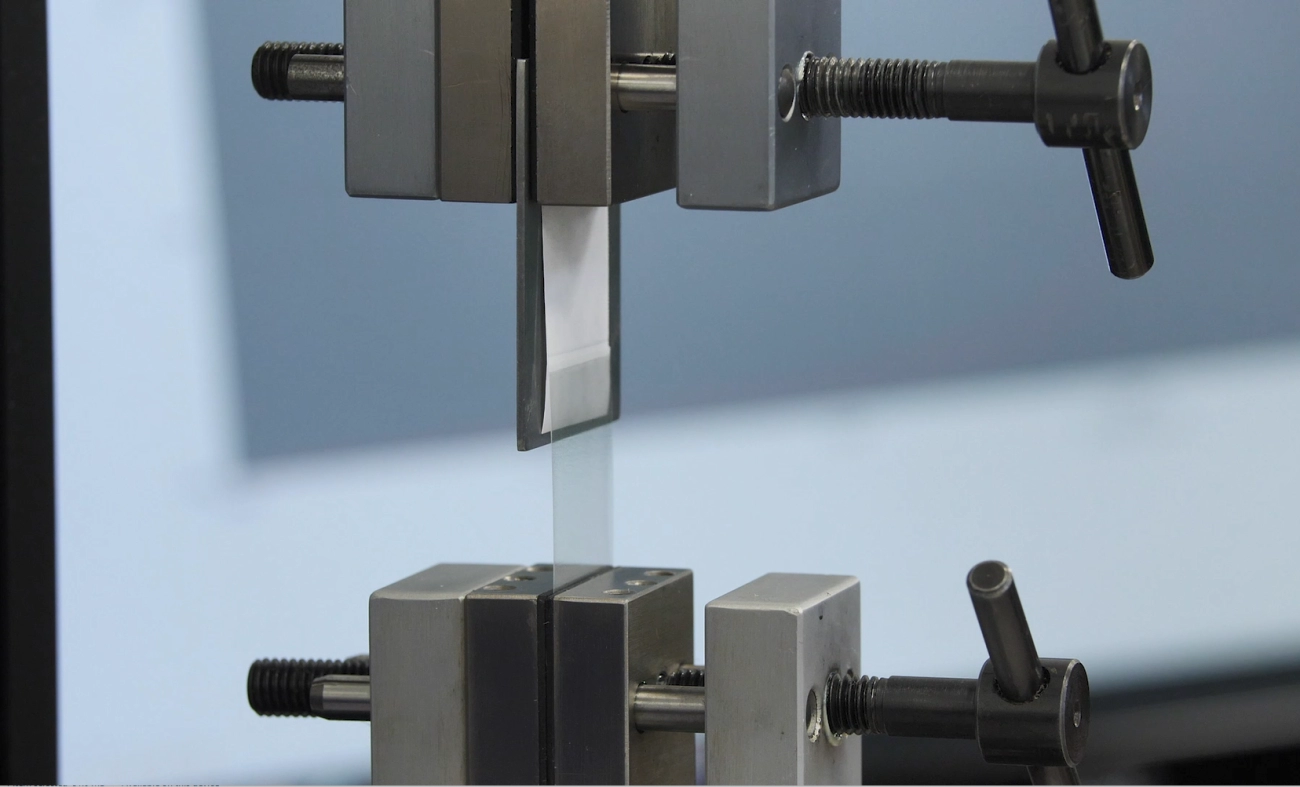
This is the industry benchmark for measuring the tensile strength of a seal. ASTM F88 involves cutting a one-inch strip of the sealed material and pulling it apart at a controlled speed to measure the force required to separate the layers.
- Technique: The tail holding method (Technique A, B, or C) determines how the material is supported during the pull.
- Relevance: It tells us if the heat, pressure, and dwell time settings on the sealer were sufficient for the specific material used.
For businesses utilizing PE material for food packaging, passing the ASTM F88 test confirms that the chemical bond is strong enough to prevent accidental opening while remaining functional for the end-user.
ASTM F1140 and F2054: Burst Testing Methods
While tensile tests look at a specific section of the seal, burst testing evaluates the entire package’s ability to withstand internal pressure.
- ASTM F1140: This is an unrestrained test where the package is inflated until it fails. It identifies the weakest point in the seal or material.
- ASTM F2054: This uses restraining plates to limit package expansion, forcing the stress directly onto the seal perimeter.
These tests are crucial for determining the minimum seal strength needed to prevent blowouts during altitude changes or physical compression in transit.
ASTM F2824: Mechanical Testing for Peelable Lids
For rigid containers sealed with flexible lids, ASTM F2824 measures the mechanical force required to separate the lid from the tray. This standard focuses on the balance between a secure closure and consumer convenience. It is particularly important when understanding aluminum foil’s role in packaging, as foil lids must provide a hermetic barrier without being impossible to peel open. We use this data to fine-tune temperature settings, ensuring the adhesive layer activates correctly without over-welding.
How to Measure and Calculate Seal Strength

To ensure our industrial sealers, like the FR-900 series, are delivering the seal integrity required for safe transport, we can’t just guess. We need concrete data. Measuring seal strength involves specific preparation and calculation methods to determine if the bond meets the necessary minimum seal strength for your specific application.
Test Specimen Preparation and Techniques (A, B, and C)
Getting accurate data starts with how you cut the sample. I always recommend cutting a uniform strip perpendicular to the seal, usually 1 inch (25.4mm) or 15mm wide, depending on the standard you are following. The edges must be clean and free of notches to avoid premature tearing.
When performing the pull test (typically using a universal testing machine), there are three standard techniques used to hold the specimen:
- Technique A (Unsupported): The sample is left free-hanging between the grips. This is the most common method but can be influenced by the stiffness of the material.
- Technique B (Supported 90°): The tail of the sample is supported by hand or a fixture at a 90-degree angle. This reduces the peeling angle’s impact on the result.
- Technique C (Supported 180°): The sample is backed by a rigid alignment plate. This is the most aggressive test for tensile strength and minimizes the variable of bag flexibility.
Calculating Maximum vs. Average Seal Strength
When we run these tests, the equipment generates a force-displacement curve. It is crucial to distinguish between two key metrics:
- Maximum (Peak) Seal Strength: This is the highest force recorded just before the seal begins to separate or the material breaks. This number is critical for understanding burst testing limits—how much sudden pressure the package can take.
- Average Seal Strength: This calculates the average force required to peel the seal apart over a specific distance. This is often a better indicator of consistency, especially for peelable seals where a smooth opening experience is required.
For heavy-duty applications using our 10mm or 12mm seal widths, we generally prioritize Peak Strength to ensure the package stays closed under stress.
Interpreting Failure Modes and Test Results
The number on the screen is only half the story; how the seal fails tells me exactly what needs adjusting on the machine.
- Adhesive Failure (Peel): The seal separates cleanly between the two layers. If the force is too low, I usually increase the temperature on the pure copper heating blocks or increase the pressure wheel tension.
- Cohesive Failure: The seal separates, but it leaves material residue on both sides. This indicates a strong bond, often seen in pouch sustainability focused materials where the sealant layer splits internally.
- Material Break (Tear): The material rips outside the seal area. This is the ideal result for non-peelable applications. It means the seal is stronger than the film itself.
- Elongation: The material stretches significantly before breaking. This is common with PE films and requires checking the conveyor speed to ensure we aren’t overheating and thinning the plastic during the sealing process.
Common Sealing Equipment and Technology

Selecting the right machinery is the foundation of our Seal Width Strength Guide. The technology you use directly dictates whether you can consistently achieve that critical 10mm or 12mm seal width required for industrial applications. We categorize equipment based on heating methods and automation levels, each serving a specific role in maintaining seal integrity.
Impulse and Constant Heat Sealers
For lower volume or tabletop operations, we often look at impulse sealers. These units apply heat only when the jaws are closed, making them energy-efficient and safer for manual use. They are excellent for basic sealer bags made of polyethylene (PE) or polypropylene (PP) where a thinner seal (typically 2mm to 5mm) is sufficient for lightweight items.
In contrast, constant heat sealers maintain a set temperature continuously. This technology is vital for thicker materials like Mylar or foil laminates that require higher, steady thermal energy to bond. Our industrial setups utilize this constant heat method to ensure the seal doesn’t fail under stress.
- Impulse: Best for thin films (0.02mm-0.05mm) and intermittent work.
- Constant Heat: Required for thick laminates and high-speed production.
Automatic Band and Vacuum Sealing Systems
When we move to high-volume packaging, automatic band and vacuum sealing systems become the standard. Our FR-900 series Continuous Band Sealers are designed to handle this workload, offering adjustable speeds of 0-12m/min. Unlike manual options, these machines utilize pure copper heating and cooling blocks. This allows for rapid, stable temperature regulation up to 300°C, ensuring that wide seals (10mm or 12mm) are bonded uniformly without cold spots.
These systems are versatile enough to handle various types of food preservative films, including composite bags and aluminum foil. The conveyor mechanism supports loads up to 5kg, meaning the machine handles the weight while the sealing bands apply the necessary pressure and heat.
Key Features of Band Sealers:
- Seal Width: Standardized at 6mm, 10mm, and 12mm for variable strength needs.
- Material Versatility: Handles PE, PP, and Aluminum Foil.
- Integrated Functions: Simultaneous sealing, embossing, and conveying.
Testing Fixtures and Tensile Strength Testers
To guarantee that our machinery is delivering the promised performance, we rely on precise testing equipment. Tensile strength testers pull the sealed area apart to measure the exact force required to break the bond. This data confirms if the seal width is sufficient for the package’s intended load.
We also utilize fixtures for burst testing, which pressurizes the bag until failure. This helps us identify if the seal is the weakest point or if the material itself fails first. Regular testing ensures that parameters like temperature (0-300°C) and pressure are calibrated correctly on the machine to prevent weak seals or “over-sealing” where the material thins out.
Step-by-Step Guide to Achieving a Secure Seal

To get the most out of your industrial packaging machinery, you need a repeatable process. Achieving a consistent Seal Width Strength Guide standard isn’t just about turning the machine on; it is about dialing in the “Trinity of Sealing”—temperature, pressure, and speed—to match your specific material. Whether I am running a high-volume line or a small batch, following these steps ensures every package leaves the conveyor belt fully secured.
Setting Optimal Sealing Parameters
The first step is calibrating your continuous band sealer. Our machines, like the FR-900 series, utilize pure copper heating and cooling blocks. This allows for rapid thermal transfer and stability, which is crucial when you are aiming for a specific minimum seal strength. You need to balance the temperature setting (0-300°C) against the conveyor speed (0-12m/min).
If the temperature is too low or the speed is too fast, the sealant layer won’t melt sufficienty to bond. Conversely, excessive heat or slow speeds can burn the film and degrade tensile strength.
Recommended Parameter Ranges:
| Material Type | Film Thickness | Temp Setting (°C) | Conveyor Speed | Recommended Seal Width |
|---|---|---|---|---|
| PE / PP | 0.02 – 0.05mm | 110°C – 140°C | Fast (8-10 m/min) | 6mm – 10mm |
| Laminates / Mylar | 0.05 – 0.10mm | 150°C – 180°C | Medium (5-7 m/min) | 10mm |
| Aluminum Foil | > 0.10mm | 180°C – 220°C | Slow (3-5 m/min) | 10mm – 12mm |
Note: Always perform a test run. Thicker bags (up to 0.80mm) require higher dwell times to ensure heat penetrates through to the sealant layer.
Proper Pouch Positioning and Handling
Even with perfect settings, poor handling ruins seal integrity. The bag must enter the sealing module flat and parallel to the heating blocks. Since our conveyors support loads between 3kg and 5kg depending on the model, you must ensure the weight of the product doesn’t drag the bag down, which causes wrinkles in the seal area.
- Align the Guide: Adjust the feed guide so the pouch enters straight.
- Flatten the Mouth: Smooth out the seal area before it hits the Teflon belts. Wrinkles create channels where air can escape, compromising the hermetic seal.
- Support the Weight: If the product is heavy, adjust the conveyor height so the bag rests fully on the belt without pulling on the seal jaws.
For more insights on optimizing your entire packaging workflow, check our packaging resources blog for operational tips.
Post-Seal Inspection and Quality Assurance
Once the bag exits the cooling block, immediate inspection is necessary. I always look for visual cues first. A proper seal should be clear (for transparent films) or have a distinct, even texture imprinted by the sealing wheel. If you are using the embossing feature to print dates, the clarity of the text is a good indicator of proper pressure application.
Quick Quality Checks:
- Visual Check: Look for bubbles, burns, or folds. A milky or cloudy seal on clear plastic often indicates the temperature is too low.
- The Tug Test: Manually pull the seal area. The material should stretch or tear before the seal itself separates. This confirms adequate tensile strength.
- Burst Check: For air-filled bags, squeeze the package. If it pops at the seal, you likely need to increase the seal width to 12mm or raise the temperature slightly.
Regularly checking the condition of your Teflon belts is also vital; worn belts lead to uneven heat transfer and weak spots in the seal.
Troubleshooting Common Sealing Issues
Even with industrial-grade machinery like our FR-900 series, operators occasionally face hurdles. Achieving the perfect balance between heat, speed, and pressure is an art. When your packaging line hits a snag, diagnosing the root cause quickly saves time and reduces material waste. Here is how we tackle the most frequent problems to maintain high seal integrity.
Weak or Inconsistent Seal Strength
If your package peels open with little effort, you likely haven’t achieved the necessary minimum seal strength. This usually stems from insufficient heat transfer or inadequate dwell time. On continuous band sealers, if the conveyor speed is set too high (approaching the 12m/min max), the bag doesn’t stay in the heating zone long enough to fuse the molecular layers.
- Check the Temperature: Ensure your setting matches the material thickness. Thicker laminates need temperatures closer to the 300°C limit, while thin PE requires much less.
- Inspect Heating Blocks: Our machines use pure copper blocks for stability, but if they are dirty or misaligned, heat transfer drops.
- Replace Consumables: A worn or burnt Teflon belt acts as an unwanted insulator. Replacing these belts regularly ensures the heat actually reaches the bag.
Material Melting, Burning, or Wrinkling
Over-sealing is just as problematic as under-sealing. If you see the plastic curling, shrinking, or burning, the energy input is too high. Wrinkling often occurs when the cooling phase is insufficient or the pressure wheel is clamped down too tight, dragging the film.
- Lower the Temperature: Dial back the heat in small increments.
- Adjust Pressure: Excessive force from the embossing or pressure wheel can squeeze molten plastic out of the seal area, thinning the material and ruining the barrier.
- Material Compatibility: Be mindful of what you are sealing. While you might need high heat when choosing the right aluminum foil for food packaging, that same setting will instantly melt standard polypropylene.
Identifying Leaks and Channel Defects
Channel defects—tiny tunnels in the seal where the film didn’t bond—are the enemies of pouch sustainability and shelf life. These often happen when the bag isn’t fed flat into the machine or if product dust (like flour or spices) contaminates the seal area.
To catch these, perform a quick burst testing procedure or a water submersion test to look for bubbles. If leaks persist:
- Widen the Seal: Switching from a 6mm to a 10mm or 12mm seal width provides more surface area to bridge small gaps.
- Align the Conveyor: Ensure the conveyor height and angle allow the bag to enter the sealing guide completely flat, preventing folds that turn into leaks.